Core Graphics/Core Animation キソのキソ #1
Core Graphics / Core Animation入門
iOS/OS Xでのグラフィック・アニメーション関連のフレームワーク
Quartz 2D
iOSでグラフィックを描画する際に裏で働いてくれる奴。UIKitはQuartzを使っている。
Core Graphics
グラフィックのコンテキスト、画像の読み込み・描画などを手伝ってくれる奴
Core Animation
iOSでのアニメーション周りを手伝ってくれる奴
iOSでグラフィックを扱う際の基本
iPhoneでも世代によって解像度が違うので、pixelとpointの関係を考える必要がある。
- iPhone 3GS : 320*480 (px)
- iPhone 4 : 640*960 (px)
iPhone 4はiPhone 3GSの2倍の解像度を持つので、iPhone 3GSで320*480pxの四角形を描いてスクリーンを埋めようとしても、iPhone 4だとスクリーンの1/4のサイズの四角形になってしまうという違いが起こるので注意。
デバイスの解像度の違いに簡単に対応するため、pixelではなくpointを指定して描画するAPIを使う。
プロジェクトを作成する
以降のサンプルはSingle View Applicationテンプレートを使用する。 プロジェクトを作成したら、新規にUIViewを継承するクラスを作成。InterfaceBuilderでビューを選択し、Identity InspectorのCutom Classセクションのクラスを、作成したクラスに向ける。
UIViewを継承したクラスの.mには予め以下のコードが含まれる:
#import "MCGraphicsViewControllerView.h"

@implementation MCGraphicsViewControllerView

- (id)initWithFrame:(CGRect)frame
{
  self = [super initWithFrame:frame];
  if (self) {
    // Initialization code
  }
  return self;
}

/*
// Only override drawRect: if you perform custom drawing.
// An empty implementation adversely affects performance during animation.
- (void)drawRect:(CGRect)rect
{
 // Drawing code
}
*/

@end
drawRect:メソッドがはビューが描画される時に自動で呼び出されるので、このメソッドにグラフィックを描画するプログラムを書いていく。
テキストを描画する
- (void)drawRect:(CGRect)rect
{
  // フォントをロードする
  UIFont *helveticaBold = [UIFont fontWithName:@"HelveticaNeue-Bold" size:40.0f];

  NSString *myText = @"yay";
  // フォントを指定して(40, 180)にテキストを描画
  [myText drawAtPoint:CGPointMake(40, 180)
             withFont:helveticaBold];
}
フォントを指定
フォントは「ファミリー > フェイス」の様に管理されているので、HelveticaのBoldが使いたければ「Helvetica(ファミリー) -> Helvetica Bold(フェイス)」の様に指定する。
システムに組み込まれているフォントは以下の様にして確認できる。
for (NSString *familyName in [UIFont familyNames]) {
  NSLog(@"Font Family = %@", familyName);
  for (NSString *fontName in [UIFont fontNamesForFamilyName:familyName]) {
    NSLog(@"+-- %@", fontName);
  }
}
他のフォントを追加したい場合にはプロジェクトにドラッグドロップしてコピーする。
ターゲットへキーを追加する
フォント名を出力させると追加したフォントが表示されるので、後は同じ。
UIFont *AliceReglar = [UIFont fontWithName:@"Alice-Regular" size:40.0f];

NSString *myText = @"almost Alice.";
[myText drawAtPoint:CGPointMake(40, 180)
           withFont:AliceReglar];
色を指定
色の指定はUIColorオブジェクトを利用して指定することができる。
// ViewController.m
- (void)viewDidLoad
{
  [super viewDidLoad];
  // Do any additional setup after loading the view, typically from a nib.
  // ビューの背景色を白にする
  self.view.backgroundColor = [UIColor whiteColor];
}
[UIColor whiteColor]の様に色を指定したり
- (void)viewDidLoad
{
  [super viewDidLoad];
  // Do any additional setup after loading the view, typically from a nib.
  self.view.backgroundColor = [UIColor colorWithRed:1.9f
                                              green:1.0f
                                               blue:1.0f
                                              alpha:1.0f];
}
赤・緑・青・透明を0~1.0の範囲で指定して色を作ることもできる。
テキストに色を設定するにはコンテキストで色をセットする。
- (void)drawRect:(CGRect)rect
{
  // 暗めの青
  UIColor *myColor = [UIColor colorWithRed:0.1f green:0.3f blue:0.5f alpha:1.0f];
  UIFont *AliceReglar = [UIFont fontWithName:@"Alice-Regular" size:40.0f];

  // 色を指定する
  [myColor set];

  NSString *myText = @"almost Alice.";
  [myText drawAtPoint:CGPointMake(40, 180)
             withFont:AliceReglar];
}

@end
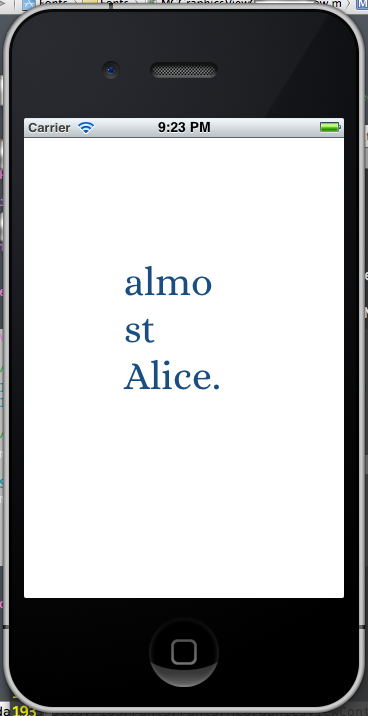
テキストを描画するにはdrawAtPoint:withFontでポイントを指定して描画する位置を決める他に、drawInRect:withFontで指定した矩形の範囲内にテキストを描画することもできる。
- (void)drawRect:(CGRect)rect
{
  // 暗めの青
  UIColor *myColor = [UIColor colorWithRed:0.1f green:0.3f blue:0.5f alpha:1.0f];
  UIFont *AliceReglar = [UIFont fontWithName:@"Alice-Regular" size:40.0f];

  // 色を指定する
  [myColor set];

  NSString *myText = @"almost Alice.";
  [myText drawInRect:CGRectMake(100,  // x
                                120,  // y
                                100,  // width
                                200)  // height
            withFont:AliceReglar];
}


