Mac掃除
いつの間にか、MacBook ProのSSDの残り容量が10GB程度になっていたので、不要なファイルを削除するためにやったこと。
コマンドライン
Terminalから5GB以上使っているディレクトリを調べる
しばらく待つと、容量が多いディレクトリがリストアップされます。 ただ、結局GUIで見れる方が便利だったので「OmniDiskSweeper」を使いました。
ディスク上の各ディレクトリ、ファイルの容量を表示して、削除することができます。 これで使いすぎている場所を削除することにしました。
ゴミ箱
放置していたため.Trashesが10GB近く使っていたので、空にする
XcodeのDerivedData
"~/Library/Developer/Xcode/DerivedData"というディレクトリが20GB位使ってました。
Xcodeでビルドしたファイルが置かれているディレクトリらしいですが、勉強用に作ったものが大量にあったので圧迫していたようです。
その他、OmniDiskSweeperを見ながらちょこちょこ消しつつ、40GB程度復活。
SublimeText2でProcessingを書く
Mac x Processing 2.0での設定です。
Processing-javaをインストールする
ProcessingのメニューからTools > Install "Processing-java" で全てのユーザにインストールする。
Sublime Packageをインストール
https://github.com/b-g/processing-sublime
パッケージコントロールからProcessingをインストール

使ってみる
Processingを起動して、新規スケッチを作成 > 保存後、スケッチをSublimeText2で開く
% subl sketch_130621c/

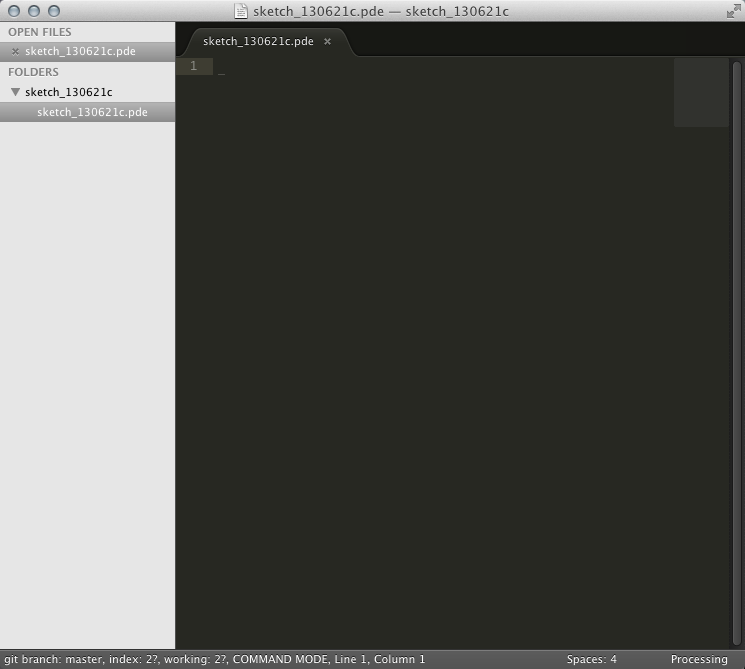
サイドバーからpdeを選択して編集します。この時点でコード補完を使えるはずです。 また、右下の言語の設定でpdeファイルを常にProcessingとして開くようにしておきます。
ビルド
void setup() {
    size( 640, 480 );
    smooth();
}

void draw() {
    background( 255 );
    drawGrid();
}

void drawGrid() {
    stroke( 225 );
    for( int i = 0; i < width / 10; i++ ) {
        line( i * 10, 0, i * 10, height );
    }

    for( int i = 0; i < height / 10; i++ ) {
        line( 0, i * 10, width, i * 10 );
    }
}
適当にスケッチを書いたら、メニューTools > Build SystemでProcessingがチェックされていることを確認して「コマンド+b」でビルドできます。

PythonでOpenCVを使うための準備
MacPorts
http://www.macports.org/install.php
/opt/local/etc/macports/souce.conf
% sudo vi /opt/local/etc/macports/sources.conf

.
.
.
http://nummist.com/opencv/ports.tar.gz #追加
OpenCV + Python2.7とOpenNIをインストール
% sudo port install opencv +python27 +openni_sensorkinect
SciPyインストール
% sudo port install py27-scipy
python2.7をデフォルトにする
% sudo port install python_select
% sudo port select python python27
.zshrc等にPYTHONPATHを通しておく
export PYTHONPATH=/usr/local/lib/python2.7/site-packages:$PYTHONPATH
動作確認
ノイズ画像を生成する
import cv2
import numpy
import os

randomByteArray = bytearray(os.urandom(120000))
flatNumpyArray = numpy.array(randomByteArray)

grayImage = flatNumpyArray.reshape(300, 400)
cv2.imwrite('RandomGray.png', grayImage)

bgrImage = flatNumpyArray.reshape(100, 400, 3)
cv2.imwrite('RandomColor.png', bgrImage)


Cinder一巡り #3
画像処理の基礎
class BasicImageProcApp : public AppBasic {
  public:
    gl::Texture texture;

    void prepareSettings( Settings* settings );
    void setup();
    void mouseDown( MouseEvent event );
    void update();
    void draw();
};

void BasicImageProcApp::setup()
{
    try {
        texture = gl::Texture( loadImage( loadResource("image.jpg") ) );
    } catch (...) {
        console() << "unable to load the texture file..." << endl;
    }

}

void BasicImageProcApp::draw()
{
    // clear out the window with black
    gl::clear( Color( 0, 0, 0 ) );

    gl::draw( texture, getWindowBounds() );
}
gl::Textureで読み込んだ画像はGPUのメモリに読み込まれ、update()などで画像を処理したい場合にはGLSLを使います。CPUに読み込むようにするとC++のコードで画像を処理することができるようになります。この場合にはSurfaceクラスを使って画像を読込み、描画するときにTextureに変換します。
#include "cinder/app/AppBasic.h"
#include "cinder/gl/gl.h"
#include "cinder/ImageIo.h"
#include "cinder/gl/Texture.h"
#include "cinder/Surface.h"

using namespace ci;
using namespace ci::app;
using namespace std;

class BasicImageProcApp : public AppBasic {
  public:
    gl::Texture texture;
    Surface surface;

    void prepareSettings( Settings* settings );
    void setup();
    void mouseDown( MouseEvent event );
    void update();
    void draw();
};

void BasicImageProcApp::prepareSettings( Settings* settings )
{
    settings->setWindowSize( 600, 800 );
}

void BasicImageProcApp::setup()
{
    try {
        surface = Surface( loadImage( loadResource("image.jpg") ) );
    } catch (...) {
        console() << "unable to load the surface file..." << endl;
    }

}

void BasicImageProcApp::mouseDown( MouseEvent event )
{
}

void BasicImageProcApp::update()
{
    texture = gl::Texture( surface );
}

void BasicImageProcApp::draw()
{
    // clear out the window with black
    gl::clear( Color( 0, 0, 0 ) );

    if( texture ) {
        gl::draw( texture, getWindowBounds() );
    }
}


CINDER_APP_BASIC( BasicImageProcApp, RendererGl );

ピクセル操作
Surface::iterクラスを使うと簡単に画像の各ピクセルにアクセスすることができます。
#include "cinder/app/AppBasic.h"
#include "cinder/gl/gl.h"
#include "cinder/ImageIo.h"
#include "cinder/gl/Texture.h"
#include "cinder/Surface.h"
#include "cinder/Channel.h"

using namespace ci;
using namespace ci::app;
using namespace std;

class BasicImageProcApp : public AppBasic {
  public:
    gl::Texture texture;
    Surface surface;

    void prepareSettings( Settings* settings );
    void setup();
    void mouseDown( MouseEvent event );
    void update();
    void draw();
};

void BasicImageProcApp::prepareSettings( Settings* settings )
{
    settings->setWindowSize( 600, 800 );
}

void BasicImageProcApp::setup()
{
    try {
        surface = Surface( loadImage( loadResource("image.jpg") ) );
    } catch (...) {
        console() << "unable to load the texture file..." << endl;
    }
}

void BasicImageProcApp::mouseDown( MouseEvent event )
{
}

void BasicImageProcApp::update()
{
    // 画像の大きさ
    Area area = surface.getBounds();
    Surface::Iter iter = surface.getIter( area );

    while( iter.line() ) {
        while( iter.pixel() ) {
            iter.r() += 1;
            iter.g() += 1;
            iter.b() += 1;
        }
    }
    texture = gl::Texture( surface );
}

void BasicImageProcApp::draw()
{
    // clear out the window with black
    gl::clear( Color( 0, 0, 0 ) );

    if( texture ) {
        gl::draw( texture, getWindowBounds() );
    }
}


CINDER_APP_BASIC( BasicImageProcApp, RendererGl );

Cinder一巡り #2
グラフィック基礎
プロジェクトを作成するとhogeApp.cppのdrawメソッドには以下のコードが書かれています。
void BasicShapesApp::draw()
{
    // clear out the window with black
    gl::clear( Color( 0, 0, 0 ) );
}
gl:clear()は指定した色で画面をクリアします。draw()は毎フレームに一度だけ呼び出されるので、デフォルトの30fpsだと1秒間に30回画面が黒で上書きされます。
色はci::Color()メソッドにRGBの値をそれぞれfloatで0~1の範囲の値を渡して指定します。
gl::clear( Color( 1.0f, 0.0f, 0.0f ))
基本的なシェイプを描画する
基本的なシェイプの描画には名前空間glにメソッドが用意されているので、それを使うことができます。
void BasicShapesApp::draw()
{
    gl::clear( Color( 0, 0, 0 ) );

    // 線を描く
    glLineWidth(2);
    gl::color( 0, 1, 1 );
    gl::drawLine( Vec2f(0, 0),
                  Vec2f(getWindowWidth(), getWindowHeight()) );

    gl::color( 1, 0, 1 );
    gl::drawLine( Vec2f(getWindowWidth(), 0 ),
                  Vec2f( 0, getWindowHeight()) );

    // 円を描く
    // x, y, radius
    gl::drawSolidCircle( Vec2f(getWindowWidth()/2, getWindowHeight()/2 ), 50 );

    gl::color( 0, 1, 1 );
    gl::drawStrokedCircle( getWindowCenter(), 100 );

    // 3つ目の引数に数値を渡すと円を描くときに使われる3角形の数を指定できる
    //gl::drawSolidCircle( getWindowCenter(), 30, 5 );


    // 矩形を描く
    gl::drawSolidRect( Rectf(getWindowWidth()/2 - 20.0f,     // left top x
                             getWindowHeight()/2 - 20.0f,    // left top y
                             getWindowWidth()/2 + 20.0f,     // right bottom x
                             getWindowHeight()/2 + 20.0f) ); // right bottom y

}
画像を読み込む
画像を扱うには、cinder/ImageIo.hとcinder/gl/Texture.hをインクルードします。
#include "cinder/ImageIo.h"
#include "cinder/gl/Texture.h"
ImageIoは画像の入出力、gl/TextureはOpenGLのテクスチャを使ってスクリーンに画像を表示するためのものです。
次に、実際に画像データを格納するための変数を用意します。
gl:Texture imgTexture;
imgTextureにはURLで指定した画像と、アプリケーションのディレクトリ内でassetsというディレクトリを作り、その中に保存した画像を使用できます。
void BasicImagesApp::setup()
{
    // URLから画像を読み込む
    imgTexture = gl::Texture( loadImage( loadUrl( Url("http://libcinder.org/docs/images/logo.png") ) ) );

    // assetsから画像を読み込む
    imgTexture = gl::Texture( loadImage( loadAsset( "MyImage.png") ) );
}

void BasicImagesApp::draw()
{
    // clear out the window with black
    gl::clear( Color( 0, 0, 0 ) );
    gl::draw( imgTexture, getWindowBounds() );
}
アニメーション
アニメーションの基本はフレーム毎に呼び出されるupdate()とdraw()内で、描画のためのパラメータに変化を与えることです。
ウィンドウサイズとフレームレートを設定して、円がアニメーションするようにしてみます。
#include "cinder/app/AppBasic.h"
#include "cinder/gl/gl.h"
#include "cinder/Rand.h"

using namespace ci;
using namespace ci::app;
using namespace std;

#define DEFAULT_RADIUS 60

class BasicAnimationApp : public AppBasic {
  public:
    Vec2f currentPos;   // 円の位置座標
    Vec2f targetPos;    // 円の目標位置座標
    float circleRadius;    // 半径

    void prepareSettings( Settings* settings );
    void setup();
    void update();
    void draw();
};

void BasicAnimationApp::prepareSettings( Settings* settings )
{
    settings->setWindowSize( 800, 600 );
    settings->setFrameRate( 60 );
}

void BasicAnimationApp::setup()
{
    // 初期位置
    currentPos = Vec2f( Rand::randFloat( 0, getWindowWidth() ),
                       Rand::randFloat( 0, getWindowHeight() ) );

    // 目標位置
    targetPos = Vec2f( Rand::randFloat( 0, getWindowWidth() ),
                       Rand::randFloat( 0, getWindowHeight() ) );

    // 初期半径
    circleRadius = DEFAULT_RADIUS;
}

void BasicAnimationApp::update()
{
    // 描画位置の決定
    Vec2f diff = targetPos - currentPos;
    diff *= 0.8f;   // イージングさせる
    currentPos = targetPos - diff;
    circleRadius--;

    // 目標位置に到達する前に新しい目標位置を決める
    if( currentPos.distance( targetPos ) < 1.0f ) {
        targetPos = Vec2f( Rand::randFloat( 0, getWindowWidth() ),
                           Rand::randFloat( 0, getWindowHeight() ) );
        circleRadius = DEFAULT_RADIUS;
    }
}

void BasicAnimationApp::draw()
{
    // clear out the window with black
    gl::clear( Color( 0, 0, 0 ) );
    gl::drawSolidCircle( currentPos, circleRadius );
}


CINDER_APP_BASIC( BasicAnimationApp, RendererGl );
Cinder一巡り #1
Cinderのセットアップ
ダウンロードページからダウンロードするかGitを使う。
以下は、Gitでクローンしてビルドする方法です。
% git clone git@github.com:cinder/Cinder.git
Boostをダウンロード
現時点でCinderのバージョンは0.8.4で、Boost1.4.8が必要になります。
http://sourceforge.net/projects/boost/files/boost/1.48.0/
Boostをダウロードしたら、解凍しCinderのディレクトリに"boost"という名前で移動します。Boost自体はビルドする必要は無いですが、Cinderのビルドに必要になります。
% cd PATH/TO/boost_1_48_0.tar.gz
% tar xvzf boost_1_48_0.tar.gz
% mv boost_1_48_0 boost
% mv boost PATH/TO/Cinder/.
% cd PATH/TO/Cinder
Cinderのビルド
% cd xcode
% ./fullbuild.sh
.
.
.
** BUILD SUCCEEDED **
ひと通りセットアップが完了したのでCinder/samplesの中にあるサンプルを動かして確認してみます。
Cinderプロジェクトを作成する
CinderにはTinderBoxというプロジェクトジェネレーターが付属しているので、それを使います。TinderBoxはCinder/tools以下にあります。
初回起動時にはCinderをインストールした場所を聞かれるので、場所を指定してあげます。
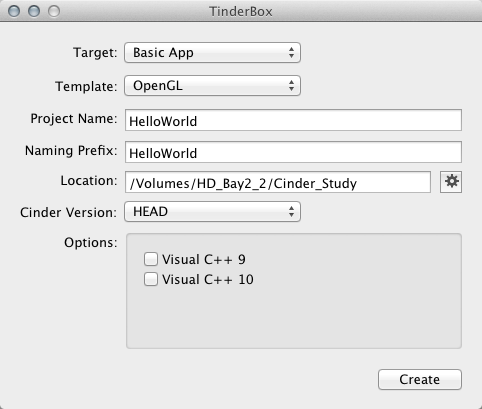
プロジェクトの設定は以下の様にしました。

"Create"を押すと、指定した場所にBaseAppディレクトリができるので、xcode/Base.xcodeprojを開きます。 実行すると黒いウィンドウが表示されればOKです。
画面の描画はSource/HelloWorldApp.cppで行なっています。
// Cinderをインクルード
#include "cinder/app/AppBasic.h"
#include "cinder/gl/gl.h"

// 名前空間
using namespace ci;
using namespace ci::app;
using namespace std;

// ベースとなるアプリケーションのクラス
// CinderのAppBasicクラスを継承する
class HelloWorldApp : public AppBasic {
  public:
    void setup();
    void mouseDown( MouseEvent event );
    void update();
    void draw();
};

// アプリケーションの実行時に一度だけ呼ばれる
void HelloWorldApp::setup()
{
}

// クリックした時に実行される
void HelloWorldApp::mouseDown( MouseEvent event )
{
}

// draw()の前に毎フレーム(デフォルトは30fps)呼ばれる
// 主に計算、データの処理などを行うのに使う
void HelloWorldApp::update()
{
}

// スクリーンに何かを描画するのに使う
void HelloWorldApp::draw()
{
    // ウィンドウの背景を黒にする
    gl::clear( Color( 0, 0, 0 ) );
}

// プログラムを実行する。レンダリングにOpenGLを使うように指定する。
CINDER_APP_BASIC( HelloWorldApp, RendererGl )
ウィンドウ内の座標は左上が原点になるので、例えば、線を描画したい場合はdraw()に以下の様に記述します。また、デフォルトでは640x480pxのウィンドウで30fpsになりますが、ウィンドウサイズを変えたい場合にはprepareSettingsというメソッドを用意してあげます。
#include "cinder/app/AppBasic.h"
#include "cinder/gl/gl.h"

using namespace ci;
using namespace ci::app;
using namespace std;

class HelloWorldApp : public AppBasic {
public:
    void prepareSettings( Settings *settings );
    void setup();
    void mouseDown( MouseEvent event );
    void update();
    void draw();
};

void HelloWorldApp::prepareSettings( Settings *settings )
{
    settings->setWindowSize( 1024, 768 );
    settings->setFrameRate(60.0f);
}

void HelloWorldApp::setup()
{
}

void HelloWorldApp::mouseDown( MouseEvent event )
{
}

void HelloWorldApp::update()
{
}

void HelloWorldApp::draw()
{
    // clear out the window with black
    gl::clear( Color( 0, 0, 0 ) );

    gl::drawLine( Vec2f(0.0f, 0.0f),
                  Vec2f(getWindowWidth(), getWindowHeight()) );

    gl::drawLine( Vec2f(0.0f, getWindowHeight()),
                  Vec2f(getWindowWidth(), 0.0f) );
}


CINDER_APP_BASIC( HelloWorldApp, RendererGl );
AndroidでProcessingを動かす
【準備するもの】
・Android実機
・Android SDK
・Processing
Processing
http://processing.org/download/
からダウンロードします。Android Modeは1.5から2.0a6は使えないようなので、以降では2.0b5で試しています。
Android SDK
Android SDK はhttp://developer.android.com/sdk/index.htmlからダウンロードします。解凍したらAndroid SDK Managerを立ち上げ、必要なツールをダウンロードします。
% cd android-sdk/tools
% ./android
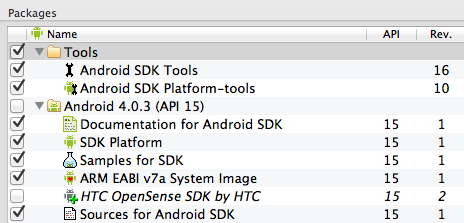
ここで、Android SDK Toolsのrevisionが20(または20以上)になっていることを確認してください。Rev.20以下では最新のProcessingが利用できません。
また、「Android 2.3.3(API 10)」の
# SDK Platform
# Google APIs
は、最低限インストールされている必要があります。
元々インストールしていたものを含め、都合「API 8 ~ 16」をAndroid SDK Managerからインストールしました。
Android実機側の準備
開発マシンと接続するための設定を行います。以下はNexus 7 (Android 4.1.2)での設定例です。
「Settings」-> 「Developer options」をONにする -> 「USB debugging」 にチェック
チェックを入れてUSBケーブルで接続すると、「USB debugging connected」という通知が出るので、Processingをたちあげてみます。
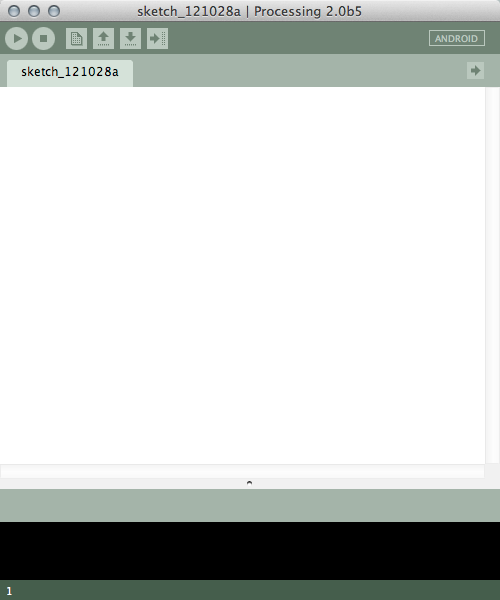
ウィンドウ右上からAndroidモードに変更し、以下のような状態になったら準備完了です。
とりあえずHello, Worldということで
void setup() {
  size(displayWidth, displayHeight, P3D);
  background(255);
  smooth();
}

void draw() {
  fill(0);
  text("Hello, World", 20, displayHeight/2);
}
のようなコードを書き、左上の「RUN」ボタンまたは「COMMAND+R」で実行すると、簡単に実機でProcessingを試すことができました。


